This topic is about SAP ERP connection to SLD in order to use it in the integration scenarios (along with SAP PI 7.31 in our case). I will show the number of steps you need to perform to register the system as SLD and how to solve the issues you may face.
First of all, we need to have a SAP Router in place before doing anything, in order to manage our connections from external systems. I have described SAP router deployment in my previous topic.
The systems landscape is the next:
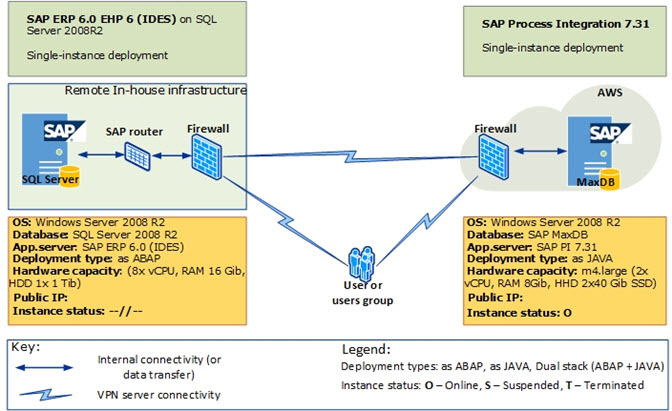
Figure 1. SAP systems landscape
SLD is deployed locally, along with the SAP PI installation.
Let’s start in a step-by-step mode. The very first step is a non-mandatory prerequisite for only those who use cloud-based solutions (like AWS or Azure), too. In the other cases, you should work with the network admin in order to grant access to the SAP PI instance from the network.
STEP 1. Make sure you have created a ‘security group’ for the instance in the cloud, so, you can now grant inbound connection to this instance. For reference, please see this document: TCP/P ports used by SAP applications. It is very handy, and I’ll be referring to it during this exercise. So, in brief, we need to open the next ports: Dispatcher (3200), Gateway (3300), HTTP (50000), HTTP over SSL (50001) – these last two are required for access to the NW Admin console on the SAP PI instance. Apart from that, you would require an ICMP protocol in order to check connectivity between servers (as it is used by echo-utilities, like ‘ping’).
Note: The exact port number may be different (depends on the values you entered during solution deployment).
STEP 2. Presumably, you have granted access to the SAP PI instance and opened all the necessary ports. So, we can now modify a SAP router table (on the SAP ERP side) and grant access for the SAP PI system to it. Make sure both systems can ping each other: Run -> cmd, ping X.X.X.X. For more precise configuration, we can use the ‘niping’ utility, which is present on both app. servers:
as ABAP: c:\usr\sap\<SID>\DEVMSGS<INST_NO>\exe\niping.exe
as JAVA: c:\usr\sap\<SID>\SCS<INST_NO>\exe\niping.exe
Note: The work principle of this utility is just like the one used in Windows Server to check the ‘distributed transactions coordinator’ availability (DTCping.exe). Roughly speaking, you run this utility in a server mode on the first machine and in client mode on the second machine. By entering an IP address and port, you’re trying to reach out a ‘server’ instance. Apart from the regular ‘ping’ command, it gives quite a detailed message on what could possibly be wrong.
STEP 3. At first, let’s start ‘niping’ in a ‘server’ mode on our SAP PI instance. For that purpose, go to the directory specified on a previous step, and in CMD (command prompt) input the following: niping –s
You will see a message in a command prompt “ready for connect from client…”. Right after that, go to the SAP ERP instance and try to call SAP PI counterparty. Use the next syntax: niping –c –H <IP address>
STEP 4. Analyze this. After the first run, you would probably see an error message like this one below:
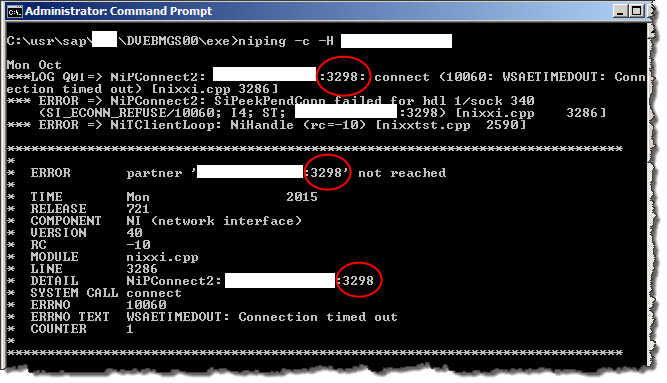
Figure 2. Niping in action
It seems that our SAP PI instance is unreachable on that port. So, in order to solve this issue, we have to open a corresponding port. In accordance to the documentation I provided in STEP 1, this port belongs to ‘niping’ and must be opened on a firewall if we want to use this util. Go to ‘Control Panel’ -> ‘System and Security’ -> ‘Windows Firewall’ -> ‘Advanced settings’ -> ‘Inbound rules’, create a new rule to allow TCP connection for the port marked on Figure 2 (i.e. 3298). Once you do that, try to run ‘niping’ again. This time, the connection was successful, and we’re able to see the following message:
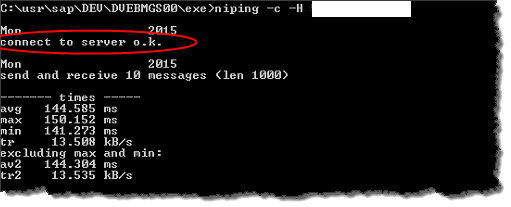
Figure 3. Niping - successfully connected to server
STEP 5. Once we have successfully established a connection to the PI instance, we are fully set to go to the second part, which is the actual registration in SLD. For that purpose, we have to establish an RFC connection from SAP ERP to SAP PI. To do so, go to t-code RZ70:
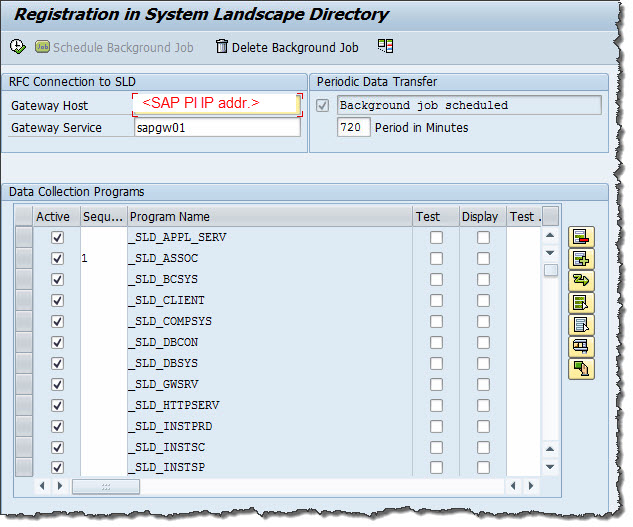
Figure 4. Registration in SLD
Specify a Gateway host (i.e. your SAP PI IP address) and Gateway Service. Normally, the name is ‘sapgw’<instance number>, i.e. sapgw01 in my case. Start SLD data collection (F5). Something went wrong and I received an error message:

Figure 5. Error when opening an RFC connection
STEP 5. Analyze that. This error message is quite common, and at first, it's hard to say what happened. Surfing on the internet won’t give you much, but instead, we have brilliant analytical tools in SAP. For that purpose, we can use the SM21 t-code. Choose the right date and time and press the ‘Reread system log’ button:
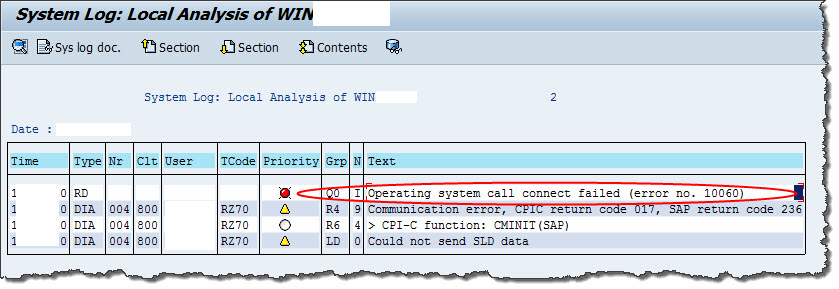
Figure 6. Analyze the log with SM21
A failed record is quickly spotted. Double click on it or select and press F2 (details). You won’t find a lot, just a general description of an error. To see more, we need to trace out the issue. So, press Ctrl+F1 or Trace button @@@.
The ‘unfolded’ log contains a lot more analytical information, i.e. what we were trying to do, what server we were trying to reach out, detailed error message etc. We are interested in one particular part below, filled with a yellow background:
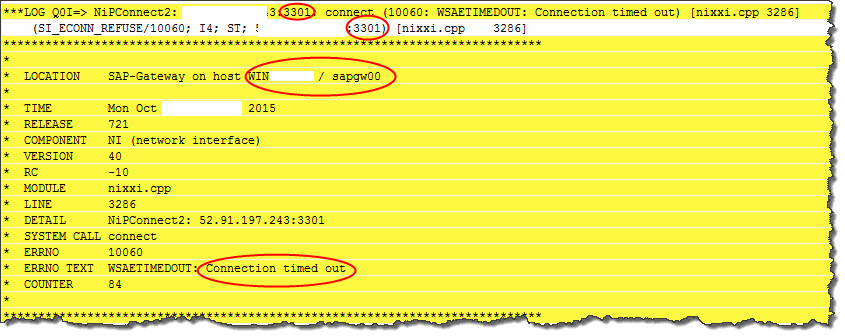
Figure 7. Analyze the log with SM21 (trace)
Among the information provided, we can see the host name, which has initiated the call (LOCATION), error text (ERRNO TEXT) and the reason, i.e. connection failed on <SAP PI>:3301. Obviously, the port is closed. Again, in accordance with the documentation, port 3301 belongs to the Gateway. Open this TCP port on the SAP PI side, just like it was described above, on STEP 4:

Figure 8. SAP ports are open on the Windows firewall
We can check if this configuration works with Telnet. If it’s not installed on the SAP instance, you can easily install it via Windows Features -> Telnet client. Enter the following in CMD: telnet <IP address> 3301. If you see a blank screen, you have successfully connected.
STEP 6. We can go back and re-try STEP 5 in RZ70. Now we can see that a new RFC connection was created (SLD_UC in my case) and RFC call was successful. So, we can finally move to the last step in our configuration.
STEP 7. Log in to SLD (with Administrator credentials) on SAP PI instance: http://<SAP PI>:50000/sld
Go to ‘Business systems’, press the ‘New business system’ button. Select ‘as ABAP’ radio button. Now, you must be able to see our SAP ERP, registered in the SLD in the ‘System’ combo-box:
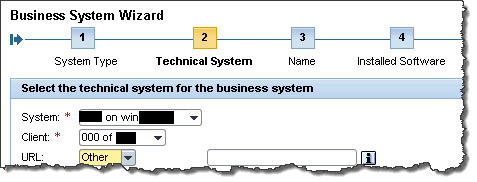
Figure 9. Business system registration in SLD
Complete registration by selecting ‘client’ and system role definition ‘Application server’. That’s it!
Of course, for the full-functional document exchange, you need to register a third-party (business) system as well, but this is another story.
Comments