Imagine a situation where you have to manage multiple Azure subscriptions (that belong to different tenants), not only for your organization but also for your company’s clients. In the software development process, you can host VSTS (Visual Studio Team Services) on your organization’s Azure account and deploy to customers’ subscriptions (which is quite a widespread use case). Subscription management in Azure is designed in such a way that you cannot have two similar products assigned to you. For instance, you cannot have two Pay-as-you-go subscriptions assigned to your account (or two BizSpark or Enterprise subscriptions, etc.) The resources from different subscriptions can be assigned to you, but you can’t manage them directly from your account, as they belong to different tenants. What if you need to build a delivery pipeline in VSTS and don’t see a target subscription (to deploy your application to) on the list? Well, it could be a problem, but before calling Microsoft’s support, let’s see what we can do with it.

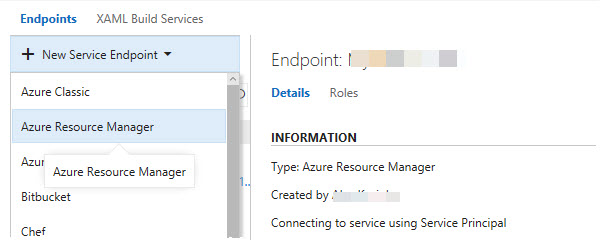
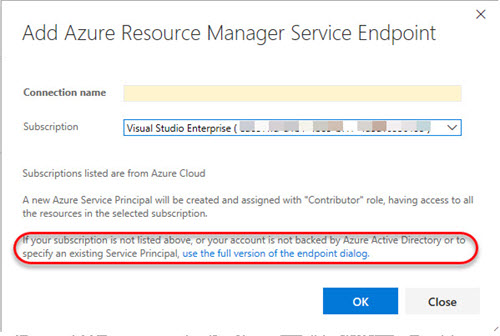
Fortunately, you can create a custom service connection by clicking ‘Manage’ next to the Azur subscriptions drop-down (see the screenshot above). When you go to ‘New Service Endpoint’ -> ‘Azure Resource Manager,' you will see a familiar list of subscriptions assigned to your account:

The dialog suggests: ‘If your subscription is not listed above, or your account is not backed by Azure Active Directory or to specify an existing Service Principal, use the full version of the endpoint dialog.’ See the screenshot below:

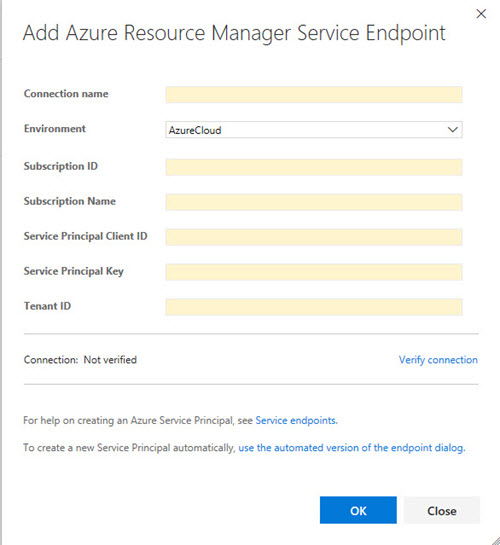
The dialogue seems complicated (at a glance) with many fields to fill-out. Let’s see what we can do:

Let's start filling this form out :)
- Connection name is the simplest – put any suitable name in here
- Environment – leave a default value (unless you’re in China, Germany or US Gov)
- Subscription ID – the id of the target subscription (you deploy to). Go to Azure -> Subscriptions, select and copy subscription ID from there. Or, you can use Azure CLI and enter:
azure login
azure account list
Copy the ID:

- Subscription Name – opposite to Id (see the previous step)
- Tenant ID – Go to Azure -> Active Directory -> Properties blade -> Copy ‘Directory ID’ from there. Alternatively, as long as you’re already logged in in the Azure CLI, you can use the following command:
azure account show
- Service Principal Client ID – is a bit more complicated. You won’t find this value anywhere. The only way is to create a Service Principal that will be assigned to this endpoint. To do so, we need to use Azure CLI (or PowerShell):
azure ad sp create -n <app> -p <password>
or
az ad sp create-for-rbac --name {appId} --password "{strong password}" (For Azure CLI 2.0)Where <app> is random app name (doesn’t really matter) and <password> - is a password for the Service Principal (and Service Principal Key at the same time). This command will create an SP:

The value you need is ‘Service Principal Names.' The last step is to assign Service Principal to a Role. Using Service Principal Name, execute the following the CLI command to assign SP to a Contributor role:
azure role assignment create --spn 990ffeff-0016-4535-809c-79db18336db4 -o Contributor
NOTE: In case you use Azure CLI 2.0 command above, SP is assigned to "Contributor" role automatically.
As long as done with this, click ‘Verify Connection’ link on the form and once it verified, you will be able to use this Endpoint to connect to the client’s subscription.
Comments