This topic is not supposed to explain CI/CD concepts; in reverse, it assumes you already know what these practices are. Visual Studio Team Services (VSTS) is a collection of hosted DevOps services for application developers. It helps to automate CI/CD processes, project tracking, store source code, etc. One of its essential functionalities is the build and release processes. To build your software, you need at least one agent. As long as VSTS is a cloud-based platform, build and release is happening 'behind the curtain', i.e. the code from your storage is copied to Microsoft VMs, being built there, packaged and promoted to an environment you've specified in the configuration. The build is a crucial processing step, and there are two options available: build/release processing on Microsoft's machines (Microsoft-hosted CI/CD) or using your own (Self-hosted build agents). There are pros and cons concerning both of these approaches:
Pros:
- You fully control the build and release environment
- You can run build and release processes as many times as you need (in hosted processing, there is a cap of 240min/month, which is free; all the above is paid)
- It's in compliance with your security regulations and you can customize the environment
Cons:
- With the self-hosted environment, you need to think about the updates
- VMs you will be using as 'integration servers' are not free and the entire infrastructure requires time and effort until fit is ully functional
- You still need to pay to run several jobs concurrently (only one agent/job is running by default)
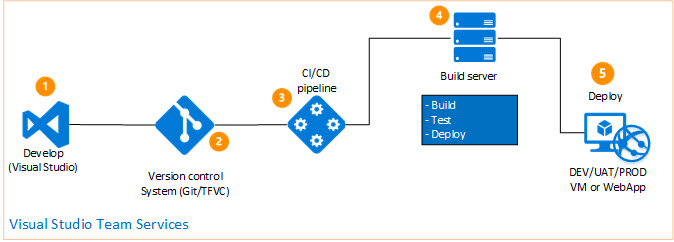
In my case, I had to build Docker images before deploying them to a Kubernetes cluster. For some of them, the build process may take 20- 30 minutes, so a default of 240 minutes is nothing. Ultimately, the processing flow would look like the following:
There is good documentation around VSTS jobs/agents limitations on Microsoft's website.
To begin, if you don't have a Linux VM, you need to deploy one first. In my case, it was Ubuntu Linux 16.04 (NOTE: Only Ubuntu 16+ is supported). For Windows users, it's simpler, as you can download the Agent using the browser. For Ubuntu, if you're accessing it via SSH the process is slightly different. Please pay attention that one of the important pre-requisites is .NET Core that should be installed on the Linux VM before you start configuring your agent. The steps are very well described in one of my posts devoted to this subject.
First and foremost, you need to know where the packages can be downloaded from. There is a link to a VSTS agent repository on GitHub: https://github.com/Microsoft/vsts-agent/releases (keep it bookmarked as there are no links to this repo from the MS documentation). Next steps:
- Being logged to your Linux VM, create a new directory for the agent (
mkdir buildagent), move to the just-created directory - To download the agent package, use the following link to the GitHub repository: https://github.com/Microsoft/vsts-agent/releases (keep it bookmarked, as there are no references to it in MS documentation)
- Use
curlcommand to download the agent to the destination directory:curl -O https://vstsagentpackage.azureedge.net/agent/2.138.3/vsts-agent-linux-x64-2.138.3.tar.gz - Unpack the archive:
tar xzf vsts-agent-linux-x64-2.138.3.tar.gz - Perform system pre-requisites check by running
./config.sh(it'll check if all required dependencies are installed, including .NET Core) - Run
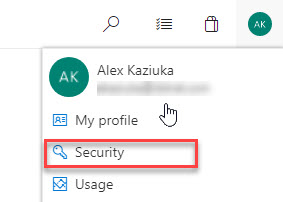
./bin/installdependencies.shto install dependencies if they're missing - Get personal access token (PAT) from your VSTS instance. To do so, go to your profile -> Security:
- Create a new token, select expiration time and scope (only tick 'Agent pools (read/manage)' checkbox, which is more than sufficient)
- Being in VSTS, create new agent pool. Go to Admin settings -> Agent pools. Add new pool (name it 'DockerBuildLinux' for instance)
- Start installing the agent using the same command, i.e.,
'./config.sh' - Enter the information you already have (the installer will prompt for PAT, agent pool name, agent name etc.)
- To install agent as a service, run '
sudo ./svc.sh install' - Start the just-created service:
'sudo ./svc.sh start' - Optional commands you can use: check the status of the service (
sudo ./svc.sh status), stop service (sudo ./svc.sh stop), uninstall service/agent (sudo ./svc.sh uninstall)
More about agent capabilities, you can read here.
Comments