
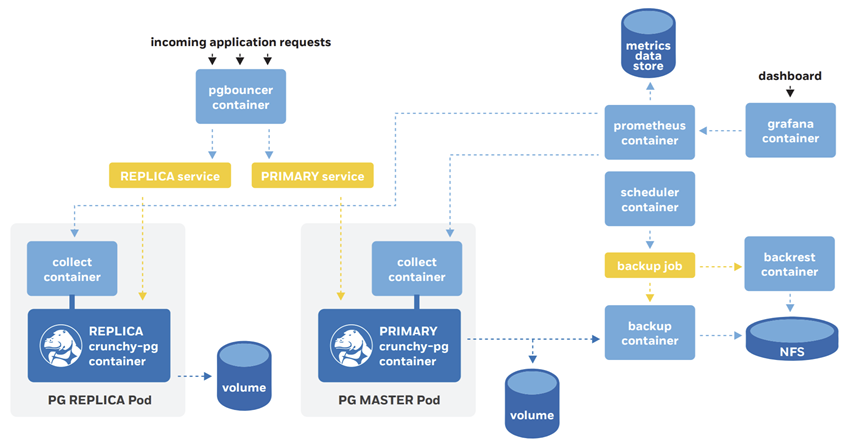
Crunchy PostgreSQL for Kubernetes is the cloud-native way to manage your own database-as-a-service (DaaS) in any public, private, or hybrid cloud. Crunchy PostgreSQL for Kubernetes is an enterprise deployment solution for PostgreSQL that unlocks true open-source cost savings and efficiency with the flexibility to run your databases on any infrastructure from a single interface.
'Cui bono' you may ask. Well, you will certainly benefit from it if you need a highly available, fully resilient, and secure database management solution entirely under your control (comparing to managed options available in the cloud, like Azure database for PostgreSQL). Crunchy Operator offers a certified Docker image for the deployment in the Kubernetes cluster of your choice and includes the following features:
- High Availability & Automated Failover Backup
- Restore and Disaster Recovery
- Geospatial Data Management
- Integrated Administration Dashboard
- Database Monitoring
In this article, I will explain how we can easily install it to Azure Kubernetes Services (AKS) from the Windows machine. As outlined on the QuickStart page here, everything that goes beyond Kubernetes cluster configuration with 'kubectl' requires bash scripts execution. Fortunately, there is an easy way to get that sort of configuration done. For that, you may need extra to your Windows 10 (if this is what you use as your development environment).
If you're not a nerd like me, who can easily spend half a day configuring the development environment adding all sorts of bells and whistles, satisfying the basic pre-requisites will only take half an hour. First and foremost, you'll require a WSL (Windows Subsystem for Linux). This is something I'm explaining in all details here. Trust me, if you just started with operations or making the traction with this craft already, you'll require this subsystem more often than you think. I do most of my job in the new Windows Terminal attached to Ubuntu WSL (including the execution of the commands with Azure CLI and scripting).
Part 1
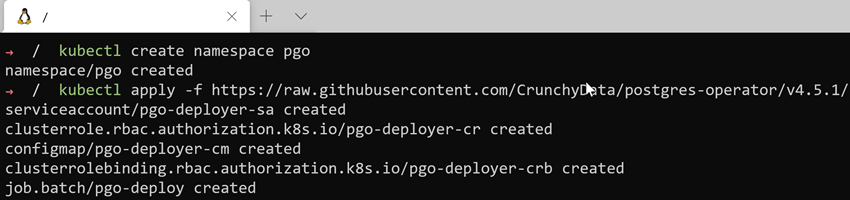
Alright! If you're done with pre-requisites, we can make the next step (assuming you already have Kubernetes instance up and running and you can connect to it with Azure CLI). As the QuickStart guide explains, let's create a default namespace in K8s and create a deployment:
kubectl create namespace pgo
kubectl apply -f https://raw.githubusercontent.com/CrunchyData/postgres-operator/v4.5.1/installers/kubectl/postgres-operator.yml
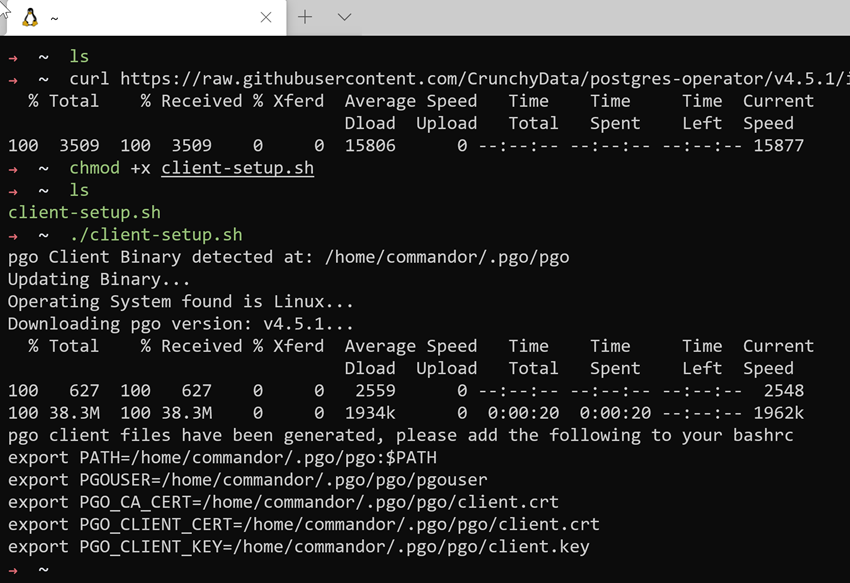
Next, let’s get the PGO client installed:
curl https://raw.githubusercontent.com/CrunchyData/postgres-operator/v4.5.1/installers/kubectl/client-setup.sh > client-setup.sh
chmod +x client-setup.sh
Run the installation script:
./client-setup.sh
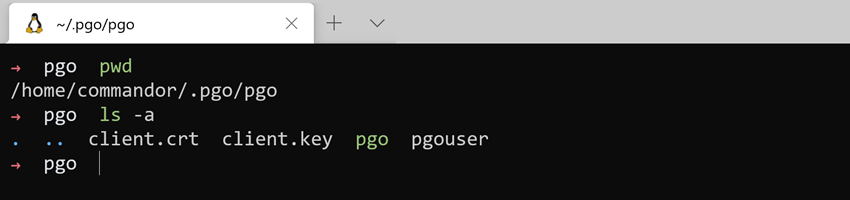
Once this command finishes the execution, you’ll the number of environment variables that need to be set. You can do that with the following simple command:
cat <<EOF >> ~/.bashrc
export PGOUSER="${HOME?}/.pgo/pgo/pgouser"
export PGO_CA_CERT="${HOME?}/.pgo/pgo/client.crt"
export PGO_CLIENT_CERT="${HOME?}/.pgo/pgo/client.crt"
export PGO_CLIENT_KEY="${HOME?}/.pgo/pgo/client.key"
export PGO_APISERVER_URL='https://127.0.0.1:8443'
export PGO_NAMESPACE=pgo
EOF

source ~/.bashrc
The PGO_APISERVER_URL and PGO_NAMESPACE are optional, but you can add them to the config too, for convenience sake (and also, if you don't plan to change the default namespace for the deployment).
NOTE: In case you have Oh My ZSH your default shell (as I do), you would need to do these changes using the ~/.zshrc file instead. More about the ZSH configuration I wrote in one of my previous articles here.
Now, it's time to check our deployment in the cluster:

Deployment is there. Let's check the API version. Run the following in one terminal tab:
kubectl -n pgo port-forward svc/postgres-operator 8443:8443
And this command in another:
pgo version
You should see the picture similar to this one (depends on your client version):

That's the sign everything was configured properly. Hurray, the first step is done!
NOTE: In case you want to install the PGO tools to your Windows machine, the CLI executable can be downloaded from the official release page. The latest version can be found on GitHub here.
Part 2
NOTE: If you don't need a Windows-specific configuration for PGO, you can skip to Part 3 down the article.
Let's take one step aside, guys. I assume many of you may ask: hell, what if I still want to use my Windows 10 with command prompt (or Cmder, which is one of my favorites)? You would still need to get the configuration script executed in the Linux environment (no matter what you choose, a Linux VM or WSL). It will produce several outputs, i.e., the environment variables and the respective artifacts they're pointing to (the certificate and the private key). All these goodies would be located in your home directory (as you can guess from the environment variables config we did above):
The beauty of WSL you may use for the purpose is that it utilizes your Windows file system, and you can easily copy these files for further use in Windows 10 environment. The copy command may look like the following:
cp * /mnt/c/Users/<your_local_win_user>/.pgo
We just copied all the files, but you would still need the right command line (CLI) util for the operating system of your choice that can be found here, as it was mentioned already. Once everything's copied to the '.pgo' directory in your user's profile, you can configure the environment variables. Open the environment variables with 'Win key + R' and then enter:
C:\Windows\System32\rundll32.exe sysdm.cpl,EditEnvironmentVariables
Hit OK (or instead, simply search for "edit environment variable" in the Start menu). You'll see two lists, and you would need to add the PGO variables to the 'User variables for <user_name>' area. My list of environment variable looks like this:
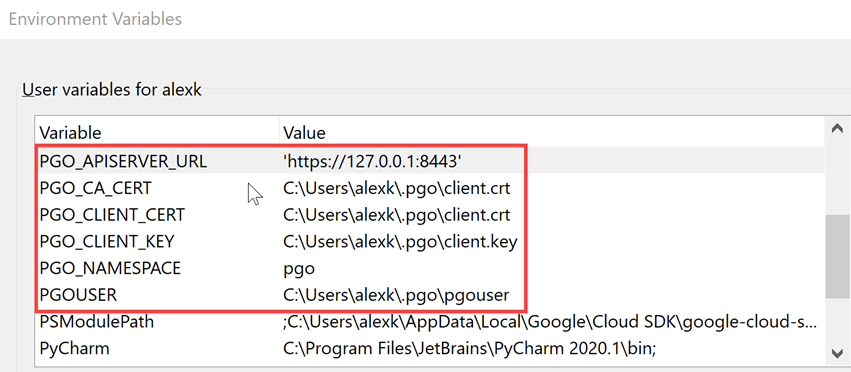
The alternative way is to use the command line for the same purpose. The full set of environment variables below:
setx PGOUSER "%USERPROFILE%\.pgo\pgouser"
setx PGO_CA_CERT "%USERPROFILE%\.pgo\client.crt"
setx PGO_CLIENT_CERT "%USERPROFILE%\.pgo\client.crt"
setx PGO_CLIENT_KEY "%USERPROFILE%\.pgo\client.key"
setx PGO_APISERVER_URL "https://127.0.0.1:8443"
setx PGO_NAMESPACE pgo
Also, add the following to ‘Path’ variables: C:\Users\<user_name>\.pgo
Once you log in with Az CLI to your cluster, you're good to do the client version test. Perform the port forward first:
kubectl -n pgo port-forward svc/postgres-operator 8443:8443
Now, execute the pgo version command to check the version of the client and the APIs:
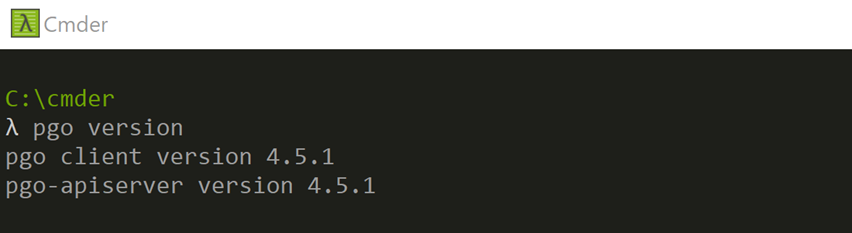
Perfect! Our Windows 10 configuration is also working.
Part 3
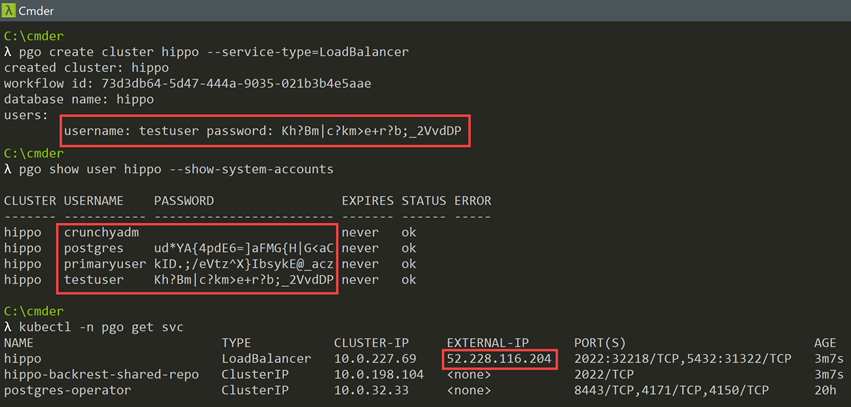
Ok, after all the preparation ceremonies, we're finally ready to deploy a cluster:
- Tunnel to your Postgres operator service in Kubernetes:
kubectl -n pgo port-forward svc/postgres-operator 8443:8443
- Deploy a cluster:
pgo create cluster hippo --service-type=LoadBalancer
- You'll receive an account you can login with to a cluster. The deployment will take a moment, and after a while, you can verify it:
pgo show user hippo --show-system-accounts
This command will show the number of system account that can be used for the databases migration and other tasks.
- Bear in mind I have deployed service for the cluster as 'LoadBalancer'. It means you can connect to it from outside of your infrastructure. The other option that would work for the production deployment is: pgo create cluster -n pgo hippo It works perfectly well for the scenarios with Azure Bastion host for secure access
Now, once we have a possibility to connect to it from outside, you can use Azure DataStudio (with PostgreSQL plugin installed). Here's the command to get the external IP of the cluster service: kubectl -n pgo get svc
Use Azure DataStudio (or any other alternative) to connect:

You're in. From this point, you can start with the configuration, monitoring, migration, and other tasks (if the deployment is connected to persistent storage).
What else?
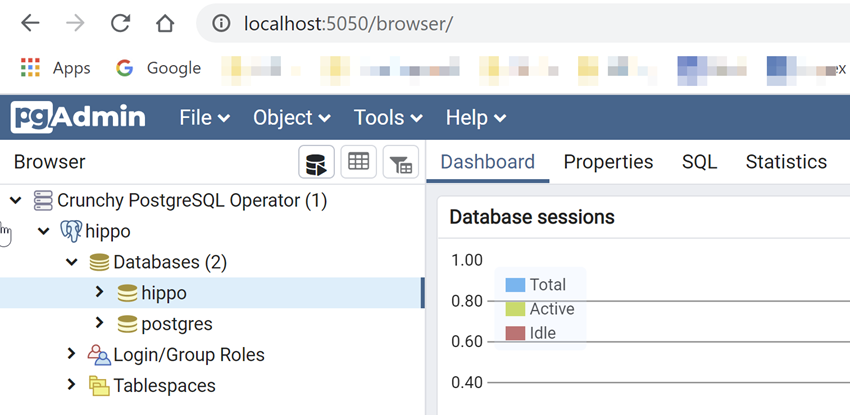
Well, there is an option to connect to a cluster using the pgAdmin tool. For that, you would need to deploy one more container (+ service):
pgo create pgadmin -n pgo hippo
Once done, you'll see the added: kubectl -n pgo get svc
To see what it offers, we have to make the port forwarding to port 5050 this time:
kubectl -n pgo port-forward svc/hippo-pgadmin 5050:5050
Once done, go to http://localhost:5050 in your browser and login with 'testuser':
That's it, guys!
Useful links:
- PGO Quickstart: https://access.crunchydata.com/documentation/postgres-operator/4.5.1/quickstart/
- Installation (general steps): https://crunchydata.github.io/postgres-operator/3.5.1/installation/
- Connecting to a cluster: https://access.crunchydata.com/documentation/postgres-operator/4.5.1/tutorial/connect-cluster/
Comments