Intro
If you already know what Continuous Integration (CI) is, you might know the benefit of it as well. CI involves producing a clean build of the system several times a day, usually using CI/CD tools like Jenkins/VSTS/TFS/AppVeyor etc., and various source-control systems (GitHub/GitLab/BitBucket). Agile teams typically configure CI to include automated compilation, unit test execution, and source control integration.
Some of the tools I listed before are quite 'heavy' and require experience to get started. Even though some of them are free (VSTS/Jenkins), they require careful components selection and this process sometimes quite painful (especially true with Jenkins). Some of the components on the marketplace are paid, besides the tools like VSTS have many restrictions, like the team size, project build minutes available, package console licenses etc.
As in the "Zombieland" movie (with Woody Harrelson), the very first survival rule: "Travel light" :)
Today I'm gonna explain how to get started with the light version of CI infrastructure really quick and painlessly which is vital for the greenfield projects (and not only) as well as keeping your infrastructure maintainable. One of the greatest tools that allow you to do so is called 'Cake' (C# make). As an official website states:
"Cake (C# Make) is a cross-platform build automation system with a C# DSL to do things like compiling code, copy files/folders, running unit tests, compress files and build NuGet packages. Cake is built on top of the Roslyn and Mono compiler which enables you to write your build scripts in C#. The source code for Cake is hosted on GitHub and includes everything needed to build it yourself".
From the Architectural perspective, Cake uses DSL with C# syntax (as I already mentioned before). DSL stands for Domain-Specific Language. This is a concept of having a small language, focused on a particular aspect of a software system. You can't build a whole program with a DSL, but you often use multiple DSLs in a system mainly written in a general-purpose language (like C#). Cake uses a specific programming model called ‘dependency-based programming’, just like the other similar systems such as Rake (for Ruby), Fake (for F#) or PSake (for PowerShell). Entire sense of this model is that we define the tasks and dependencies between them for our program. More details about this model can be found on Martin Fowler’s website (see the links to the respective resources below). The mentioned model encourages to design the build process as a set of tasks and dependencies between them. Although, logical execution goes in reverse order.
Cake benefits
So, what's the benefit? Cake, of course, is not the only way to build your project/code. As an option, you can use plain MSBuild, PowerShell, bat/bash scripts, different CI platforms and all these options have some advantages as well as downsides:
- PowerShell/bat/bash scripts are hard to maintain
- C# syntax. It is always better to develop scripts using the same language as the main project (for the consistency sake) and avoid unmaintainable, hard to understand and confusing structures
- Using a CI platform assumes a ‘vendor lock-in.’
- Using CI platform does not allow to build the code locally as you do on the server
Cake offer familiar tools to work with, (which are C# and PowerShell) in a cross-platform environment it supports MSBuild, MSTest, NUnit/xUnit etc., it's opensource and reliable, can be integrated with VSTS, Jenkins, TeamCity, AppVeyor etc., what could be better? It allows you to start light and quickly and grow the functionality you require over time.
Ok, enough theory! Let's have our hands dirty...
Basic prep
There are two main options on how to get started:
- Clone or download repository and copy
build.ps1 file to your solution
- Install the Cake bootstrapper. It will also install all the dependencies required to your system (I'd prefer this option):
Invoke-WebRequest http://cakebuild.net/download/bootstrapper/windows -OutFile build.ps1
Build.ps1 - This is a bootstrapper PowerShell script that ensures you have Cake and required dependencies installed.
NOTE: The bootstrapper script is also responsible for invoking Cake. This file is optional, and not a hard requirement. If you would prefer not to use PowerShell you can invoke Cake directly from the command line, once you have downloaded and extracted it.
The next and last thing to do - add file build.cake This is the most important file because inside it we will implement our logic. Place build.cake file to the project's root, along with build.ps1 file. Now, you're ready for the first run!
PS> .\build.ps1
Congrats! You just completed the first step in this journey.
Let's cook something!
Unit of work in Cake is represented by Tasks. It means that to perform a build you have to create a task in the build.cake file. Add the following line to this file (depends on your solution name):
var target = Argument("target", "Default");
Task("Default")
  .Does(() =>
{
  MSBuild("ASPNET_Core.sln");
});

RunTarget(target);
Now, if you execute build.ps1 script using either power shell (.\build.ps1) or regular command line (powershell .\build.ps1) you'll see the solution being built and the results of the task execution: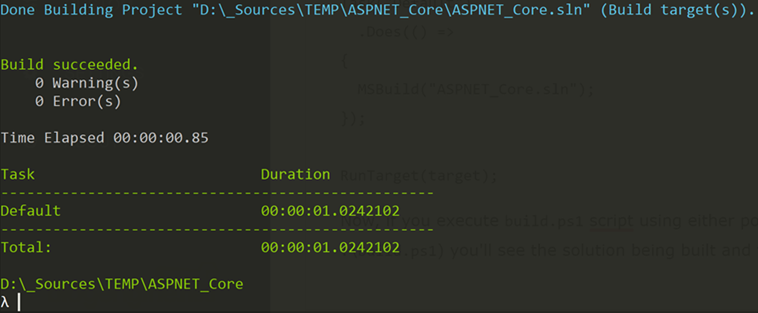
Above we define a task named “Default” which calls MSBuild. Then to invoke Cake by calling RunTarget specifying our default task.
Let’s go a bit deeper. We can easily imagine a typical build cycle for our application:

- Build the code using MSBuild
- Run Unit tests (using XUnit lib or similar)
- Package dll into NuGet package
- Push the package to the feed (nuget.org or a private one)
Let’s consider the entire process step-by-step on the example of dummy .NET Core solution.
Build the code
To build our code we need to do the following:
- Restore nuget-packages (using NuGetRestore function)
- Assemble our solution using default function DotNetBuild and pass a configuration parameter to it
Here is our task described with Cake-DSL:
var target = Argument("target", "Default");
var projectName = "Test";
var solution = "./" + projectName + ".sln";Task("Build")
Task("Restore-NuGet-Packages")
    .IsDependentOn("Clean")
    .Does(() =>
    {
        NuGetRestore(solution);
        DotNetCoreRestore(solution);
    });

Task("Build")
    .IsDependentOn("Restore-NuGet-Packages")
    .Does(() =>
    {
        MSBuild(solution, new MSBuildSettings(){Configuration = configuration, ToolPath = msBuildPathX64}
                                               .WithProperty("SourceLinkCreate","true"));
    });
RunTarget(target);
Function RunTarget executes our task right away so we can check if our script works.
Run tests
To run tests for the .NET Core application, we need DotNetCoreTest function. To be able to use xUnit framework, it’s required to use pre-processor directive (#tool), so we can reference respective library:
#tool "nuget:?package=xunit.runner.console&version=2.3.0-beta5-build3769"
The actual task:
Task("Run-Unit-Tests")
    .IsDependentOn("Build")
    .DoesForEach(testProjects, testProject =>
    {
      foreach (string targetFramework in testProject.Item2)
      {
        Information($"Test execution started for target frameowork: {targetFramework}...");
        var testProj = GetFiles($"./test/**/*{testProject.Item1}.csproj").First();
        DotNetCoreTest(testProj.FullPath, new DotNetCoreTestSettings { Configuration = "Release", Framework = targetFramework });
      }
    })
    .DeferOnError();
Please pay attention it depends on the build task (IsDependentOn).
Create a nuget package
To pack everything into a nuget package, we can use the following NuGet spec:
<?xml version="1.0" encoding="utf-8"?><package xmlns="http://schemas.microsoft.com/packaging/2010/07/nuspec.xsd">
<metadata>
<id>Solution</id>
<version>1.0.0</version>
<title>Test</title>
<description>Demo solution</description>
<authors>User</authors>
<owners>User</owners>
<requireLicenseAcceptance>false</requireLicenseAcceptance>
<tags></tags>
<references>
<reference file=" ASPNET_Core.dll" />
</references>
</metadata>
<files>
<file src=".\ ASPNET_Core.dll" target=" netcoreapp2.1 "/>
<file src=".\ ASPNET_Core.pdb" target=" netcoreapp2.1 "/>
</files></package>
Leave this file next to build.cake script. During the task execution, we’ll move all the artifacts to the folder with the same name. By default, NuGet packages will be dropped to the root folder. We can ‘tell’ Cake to use ‘packages’ directory instead:
Task("Pack")
.IsDependentOn("Run-Unit-Tests")
.Does(()=>
{
var packageDir = @"..\packages";
var artefactsDir = @"..\.artifacts";
MoveFiles("*.nupkg", packageDir);
EnsureDirectoryExists(packageDir);
CleanDirectory(packageDir);
EnsureDirectoryExists(artefactsDir);
CleanDirectory(artefactsDir);
CopyFiles(@"..\Test\ ASPNET_Core \bin\" + configuration + @"\*.dll", artefactsDir);
CopyFiles(@"..\Test\ ASPNET_Core \bin\" + configuration + @"\*.pdb", artefactsDir);
CopyFileToDirectory(@".\Solution.nuspec", artefactsDir);
NuGetPack(new FilePath(artefactsDir + @"\Solution.nuspec"), new NuGetPackSettings
{
OutputDirectory = packageDir
});
});
RunTarget("Pack");
Pushing packages to NuGet feed
To push packages to the NuGet feed, we can use (guess what?), right, ‘NuGetPush’ function! 😊
So, the task for publishing can be described with the following DSL syntax:
var nugetApiKey = Argument("NugetApiKey", "");
Task("Publish")
.IsDependentOn("Pack")
.Does(()=>
{
NuGetPush(GetFiles(@"..\packages\*.nupkg").First(), new NuGetPushSettings {
Source = "https://www.nuget.org/api/v2",
ApiKey = nugetApiKey
});
});
RunTarget("Publish");
Final words
We have considered a simple way of using Cake for the build automation tasks. More complicated scenarios assume different kind of integrations (with Slack for instance), code coverage reports generation, etc. Cake has a big community and many different add-ons that make developers’ life simpler.
References:
- Domain Specific Languages, Martin Fowler
- Dependency-based programming, Martin Fowler