Assuming you read all my previous articles (or at least part of them) related to Kubernetes, you’re ready to move from theory to practice. Meaning, you know K8s Fundamentals, how to deal with Kubernetes secretes and even how to deploy all this stuff using Azure DevOps.
Part 1: The simplest scenario
Now we need to have a more production-like environment. Using IP’s to access your services is still fine for some cases (in DEV), although, assigning a domain name is better. To achieve this, you go to your favourite ISP and create a domain (or a sub-domain). Something is bothering you and suddenly flickers – ‘Hold on! I don’t control the external IP’s assignment for the Service, what if it would change due to re-deployment?’, and you’ll be totally right. In this case, once the IP has changed, you would need to go to the DNS management console and update it there. As you may know, the changes propagation may take a while, and you probably shouldn’t use this approach for the business-critical resources. The way out is straightforward – the IP can be reserved in the cloud provider you use (Azure in our case):
Azure CLI:
az network public-ip create --name TestIP --resource-group TestRG --location eastus --allocation-method Static
The next part is simple, we need to introduce a new ‘loadBalancerIP’ property in our manifest file. In my case it looks like the following:
apiVersion: v1

kind: Service

metadata:

  name: angular7-fe

spec:

  loadBalancerIP: 52.227.44.101

  type: LoadBalancer

  ports:

  - port: 80

    targetPort: 4200

  selector:

    app: angular7-fe
Once done, you can assign a domain name to this IP so that it will be pointing to K8s Service.
There is a trick though. The IP address must be created within the same Node resource group (RG) in Azure. Otherwise, it won’t work.
NOTE: Starting from Kubernetes 1.10 in Azure you can use static IPs created outside Node resource group. However, a Service Principal of the AKS must have delegated permissions to that RG.
This is a sad part, because I may not remember a Service Principal (SP) name I have created the cluster with and nobody explains how to get it. Here is another trick. To get your SP, simply go to the Azure Active Directory instance within the same subscription. Switch to ‘App registrations’ blade and click ‘View all applications’ button. ‘SP Client ID’ required as the command line argument would be ‘Application ID’ spotted in ‘App registrations’ for the respective SP.
If you need more details about SP, simply use this CLI command:
az ad sp show --id <app id>
The full Azure CLI statement would be the following:
az role assignment create --assignee <SP Client ID> --role "Network Contributor" --scope /subscriptions/<subscription id>/resourceGroups/<resource group name>
If you don’t know ‘--scope’ argument value it can either be found in the RG properties or using the following command:
az group show -n <my resource group name>
And finally, we need to add an annotation to our initial ‘yaml’ file and re-deploy it:
apiVersion: v1

kind: Service

metadata:

  annotations:

    service.beta.kubernetes.io/azure-load-balancer-resource-group: <my RG name>

  name: angular7-fe

spec:

  loadBalancerIP: 52.227.44.101

  type: LoadBalancer

  ports:

  - port: 80

    targetPort: 4200

  selector:

    app: angular7-fe
As you may notice, we have added an annotation to reflect the fact that the static IP we have provisioned should be taken from the external RG. The full list of such annotations related to a Load Balancer in Azure can be found on the respective GitHub page.
Part 2: Going further improving our infrastructure
Even though using a static IP for the K8s Service is a valid solution, it has nothing to do with the scalable production-like approach. Rule-based routing and SSL termination would also be a problem. To overcome all these issues the community started building what is called “Ingress”[1]. The component that is deployed into the cluster to resolve these concerns is also called ‘Ingress Controller’.
What you need to know about Ingress
- ‘Ingress’ (the opposite to egress) comes from the networking world. It is a collection of rules that allow inbound connections to reach the cluster services
- It can also be configured to expose services through
- External URLs
- Load balancers
- SSL-terminated endpoints
- Name-based virtual hosting
Ingress is a layer on top of the Kubernetes Services (which is the correct place by design), it exposes HTTP and HTTPS routes from outside the cluster to services within the cluster. Rules defined on the ingress level control traffic routing:
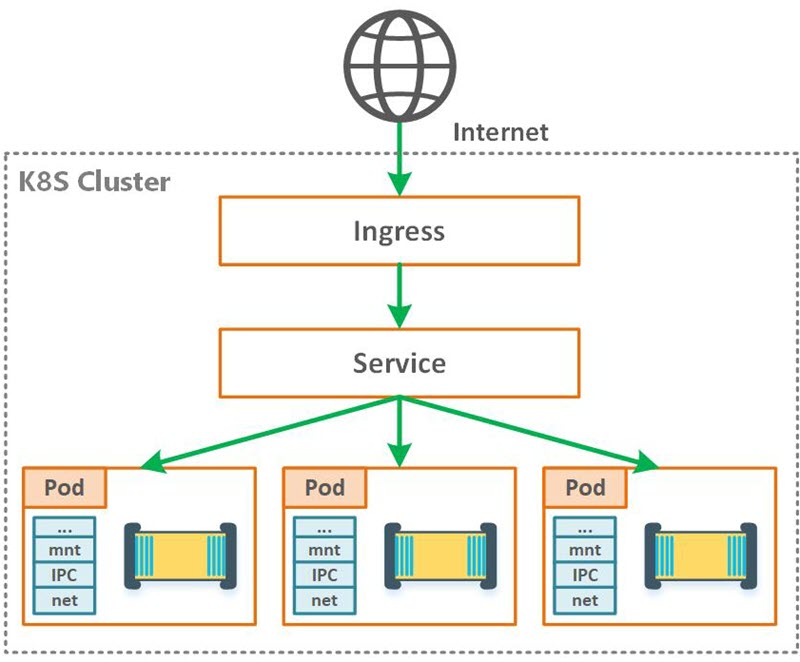
Figure 1. Ingress controller (HL diagram)
Talking about Ingress Controllers for Kubernetes, there are plenty of options:
De-facto standard is NGINX, although, as an Architect, I have no bias concerning the Ingress Controller (or other technologies) I work with. We won’t be considering NGINX just because everybody else uses it. All the listed controllers above are production ready and are used by the giants for a long time (for the curiosity sake, just take a look at the Envoy landing page). Instead, we’ll move forward with Traefik which has nice documentation and fancy dashboard that helps to understand what’s going on. If you would decide to use any other Ingress after that, you won’t have any issues with that.
Now, as long as you’re having the understanding what Ingress is for, we can start with deployment and configuration. You can use whatever containerized application you have, although if you have nothing, feel free to use a sample app from the GitHub and the respective instruction on how to get started.
Part 3: Getting your hands dirty
Traefik is open-source software and has sample scripts on GitHub we can use right away with tiny modifications, as we’ll be using a cluster hosted in Azure, not a local minicube. To get started, make sure that kubectl is installed (the binary is added to your PATH env. variable) and you’re logged-in to the correct subscription in Azure. Use the guide I mentioned above if you don’t know how to do that.
There are two ways you can deploy Traefik in Kubernetes cluster:
If you configured Helm according to the instructions above, the actual deployment is simple:
helm install stable/traefik --set dashboard.enabled=true,dashboard.domain=dashboard.localhost
This command will deploy the latest version of Traefik, and the dashboards will be available at ‘dashboard.localhost’. To make it accessible through the browser, you would need to map the Traefik service IP to this hostname in ‘hosts’ file. Bear in mind that in spite of the ease of use and certain automation, the chart will deploy Traefik with randomly generated name and in the default namespace.
I prefer more transparent and customizable way of deployment, which is ‘.yaml’ scripts. If your cluster is configured with RBAC, you will need to authorize Traefik to use the Kubernetes API. The first script (out of four we need to apply):
---

# Traefic_rbac.yaml

---

kind: ClusterRole

apiVersion: rbac.authorization.k8s.io/v1beta1

metadata:

  name: traefik-ingress-controller

rules:

  - apiGroups:

      - ""

    resources:

      - services

      - endpoints

      - secrets

    verbs:

      - get

      - list

      - watch

  - apiGroups:

      - extensions

    resources:

      - ingresses

    verbs:

      - get

      - list

      - watch

---

kind: ClusterRoleBinding

apiVersion: rbac.authorization.k8s.io/v1beta1

metadata:

  name: traefik-ingress-controller

roleRef:

  apiGroup: rbac.authorization.k8s.io

  kind: ClusterRole

  name: traefik-ingress-controller

subjects:

- kind: ServiceAccount

  name: traefik-ingress-controller

  namespace: kube-system
Apply configuration:
kubectl apply -f Traefik_rbak.yaml
Next, we need to deploy Traefik. It is possible to use Traefik with a Deployment or a DaemonSet object, whereas both options have their own pros and cons (you may need fewer deployments with Deployment whereas DaemonSet deploys Traefik to every Node you instantiate within the cluster which has certain benefits). We’ll move forward with DaemonSet deployment type:
---

# Traefik_deploy.yaml

---

apiVersion: v1

kind: ServiceAccount

metadata:

  name: traefik-ingress-controller

  namespace: kube-system

---

kind: DaemonSet

apiVersion: extensions/v1beta1

metadata:

  name: traefik-ingress-controller

  namespace: kube-system

  labels:

    k8s-app: traefik-ingress-lb

spec:

  template:

    metadata:

      labels:

        k8s-app: traefik-ingress-lb

        name: traefik-ingress-lb

    spec:

      serviceAccountName: traefik-ingress-controller

      terminationGracePeriodSeconds: 60

      containers:

      - image: traefik

        name: traefik-ingress-lb

        ports:

        - name: http

          containerPort: 80

          hostPort: 80

        - name: admin

          containerPort: 8080

        securityContext:

          capabilities:

            drop:

            - ALL

            add:

            - NET_BIND_SERVICE

        args:

        - --api

        - --kubernetes

        - --logLevel=INFO

---

kind: Service

apiVersion: v1

metadata:

  name: traefik-ingress-service

  namespace: kube-system

spec:

  selector:

    k8s-app: traefik-ingress-lb

  ports:

    - protocol: TCP

      port: 80

      name: web

    - protocol: TCP

      port: 8080

      name: admin

  type: LoadBalancer
Apply configuration:
kubectl apply -f Traefik_deploy.yaml
Check Pods and the Services being provisioned:
kubectl --namespace=kube-system get pods

kubectl --namespace=kube-system get svc
And finally, we need to expose our Ingress and Traefik UI service so that we can reach a dashboard and Traefik endpoint:
---

# Traefik_ui.yaml

---

apiVersion: v1

kind: Service

metadata:

  name: traefik-web-ui

  namespace: kube-system

spec:

  selector:

    k8s-app: traefik-ingress-lb

  ports:

  - name: web

    port: 80

    targetPort: 8080

---

apiVersion: extensions/v1beta1

kind: Ingress

metadata:

  name: traefik-web-ui

  namespace: kube-system

spec:

  rules:

  - host: tf-dev.localhost

    http:

      paths:

      - path: /

        backend:

          serviceName: traefik-web-ui

          servicePort: web
As you may notice, I used ‘tf-dev.localhost’ for the host. It can either be replaced with the real hostname we were discussing in the beginning, or you can map this one to the Traefik’s Service in the ‘hosts’ file to reach it via the browser (although it will be reachable via automatically assigned external IP anyway):
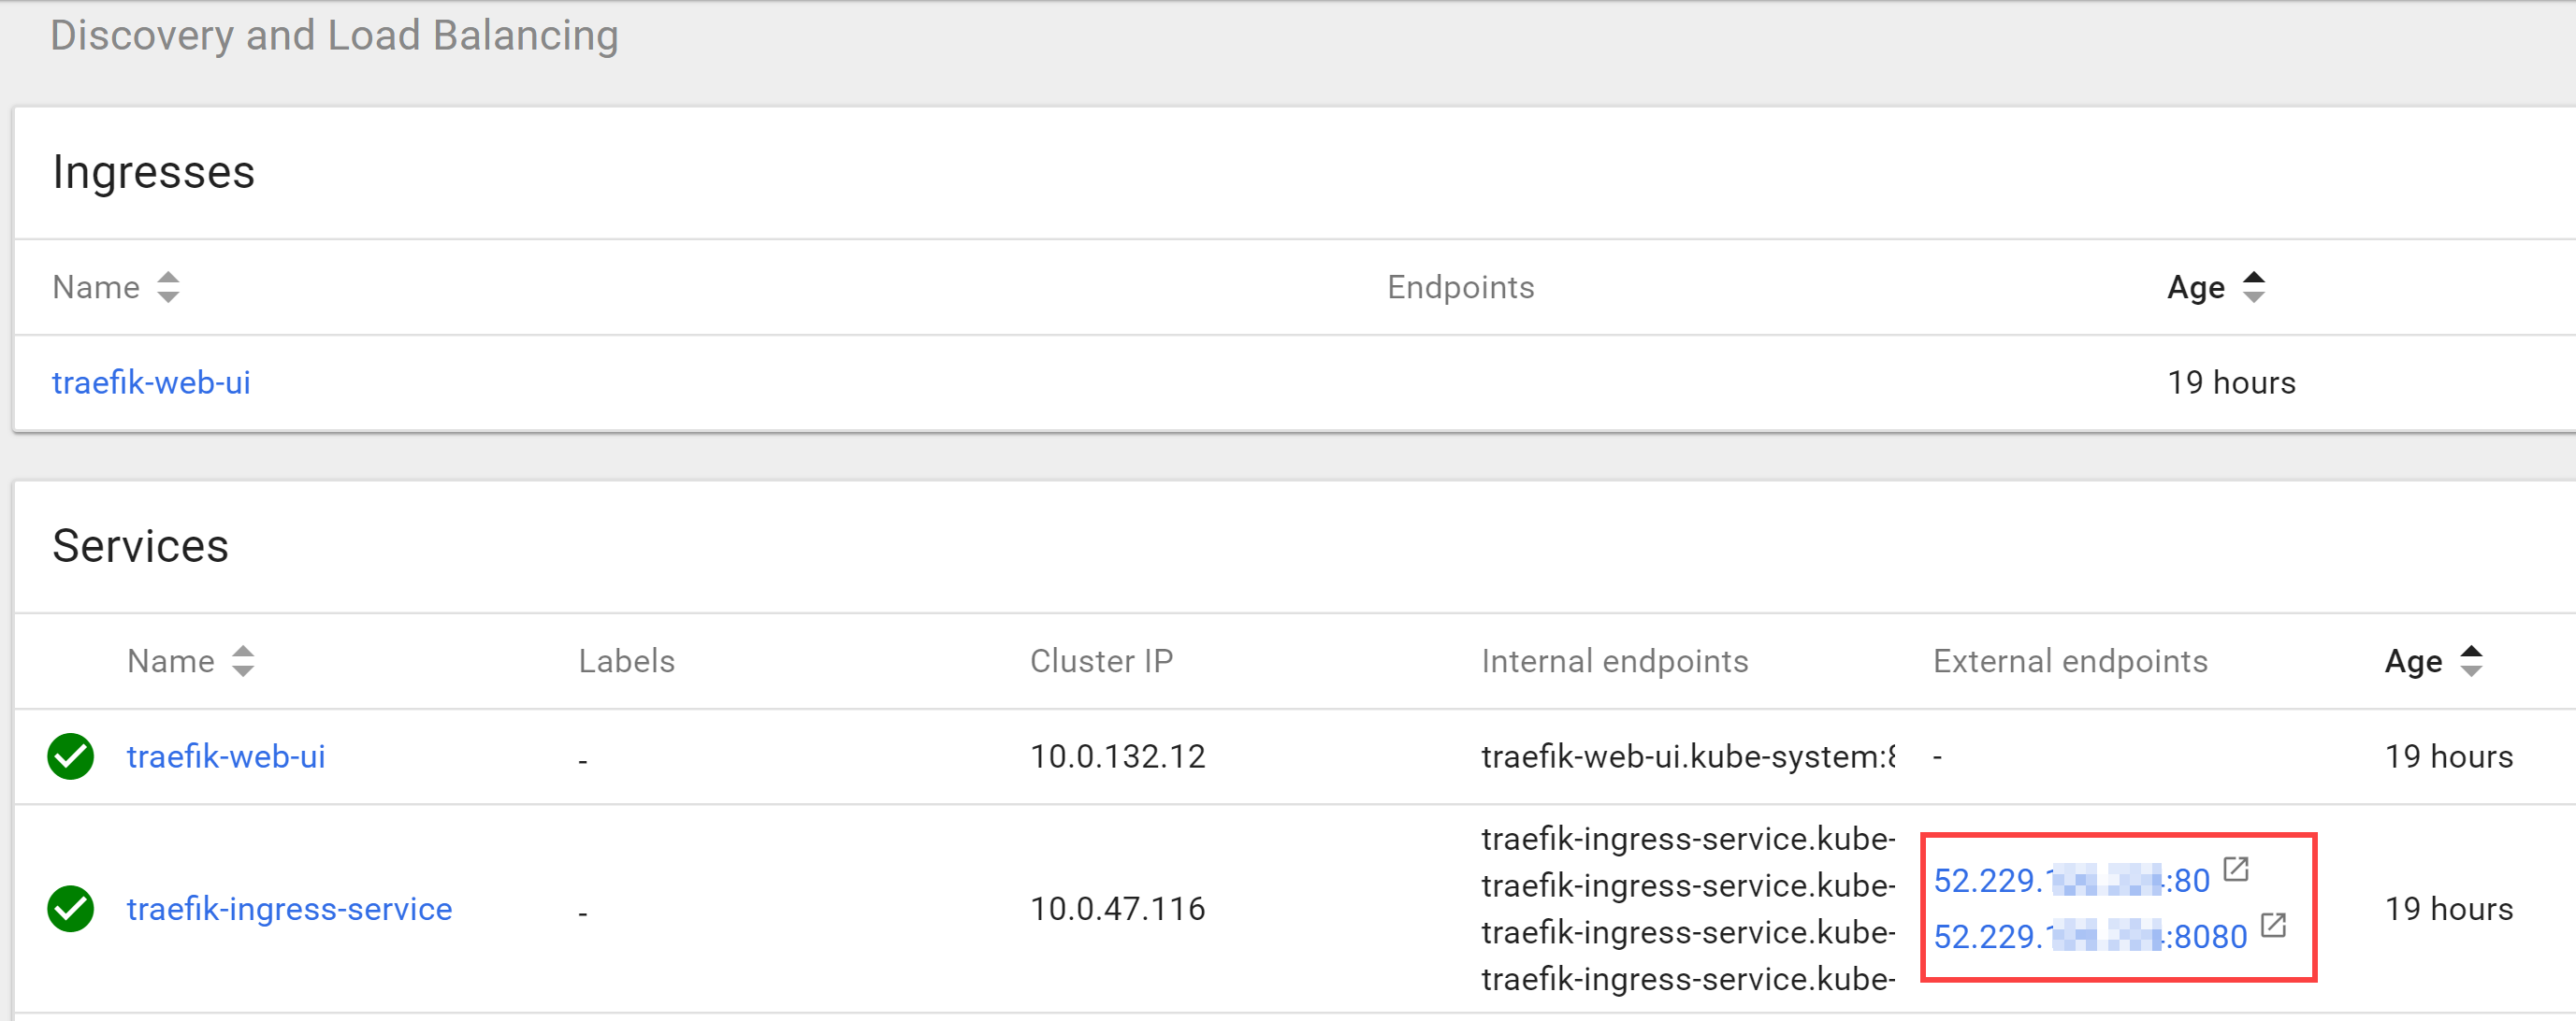
Figure 2. Traefik ingestion endpoint and dashboard IP's
And finally, the last script we need to apply related to our application Service configuration. We need to ‘explain’ the app that it will be working through the Ingress Controller from now on.
apiVersion: extensions/v1beta1

kind: Ingress

metadata:

  name: angular7-web-ingress

  annotations:

    kubernetes.io/ingress.class: traefik

spec:

  rules:

  - host: beta.mycooldomain.com

    http:

      paths:

      - path: /

        backend:

          serviceName: angular7-service

          servicePort: http
This chunk of markup means that we deploy an Ingress for the respective Service (angular7-service) and the fact that Traefik should take care of it (kubernetes.io/ingress.class: traefik). As you already seen in this article, the annotations is a powerful mechanism in Kubernetes objects configuration, and this one is not an exception. I assume you already have a working app in the cluster and if not, the names would be different. Make sure you gave the app and respective Service conscious names to avoid confusion in configuration.
The way routing rules are applied and resolved is the following:
- We point our domain (mycooldomain.com) to a Traefik ingress endpoint. See Figure 2. Traefik ingestion endpoint and dashboard IP's for more information. In this case, Traefik endpoint would be 52.229.xxx.xxx:80 (port 80) and the dashboard is always used port 8080.
- The ‘.yaml’ above maps (routes, if you will) the traffic for the specified domain to a respective app Service (angular7-service)
- There is no need for the Service to be deployed as a LoadBalancer. Traefik uses internal addressing for the traffic routing as you will see on the screenshot below:
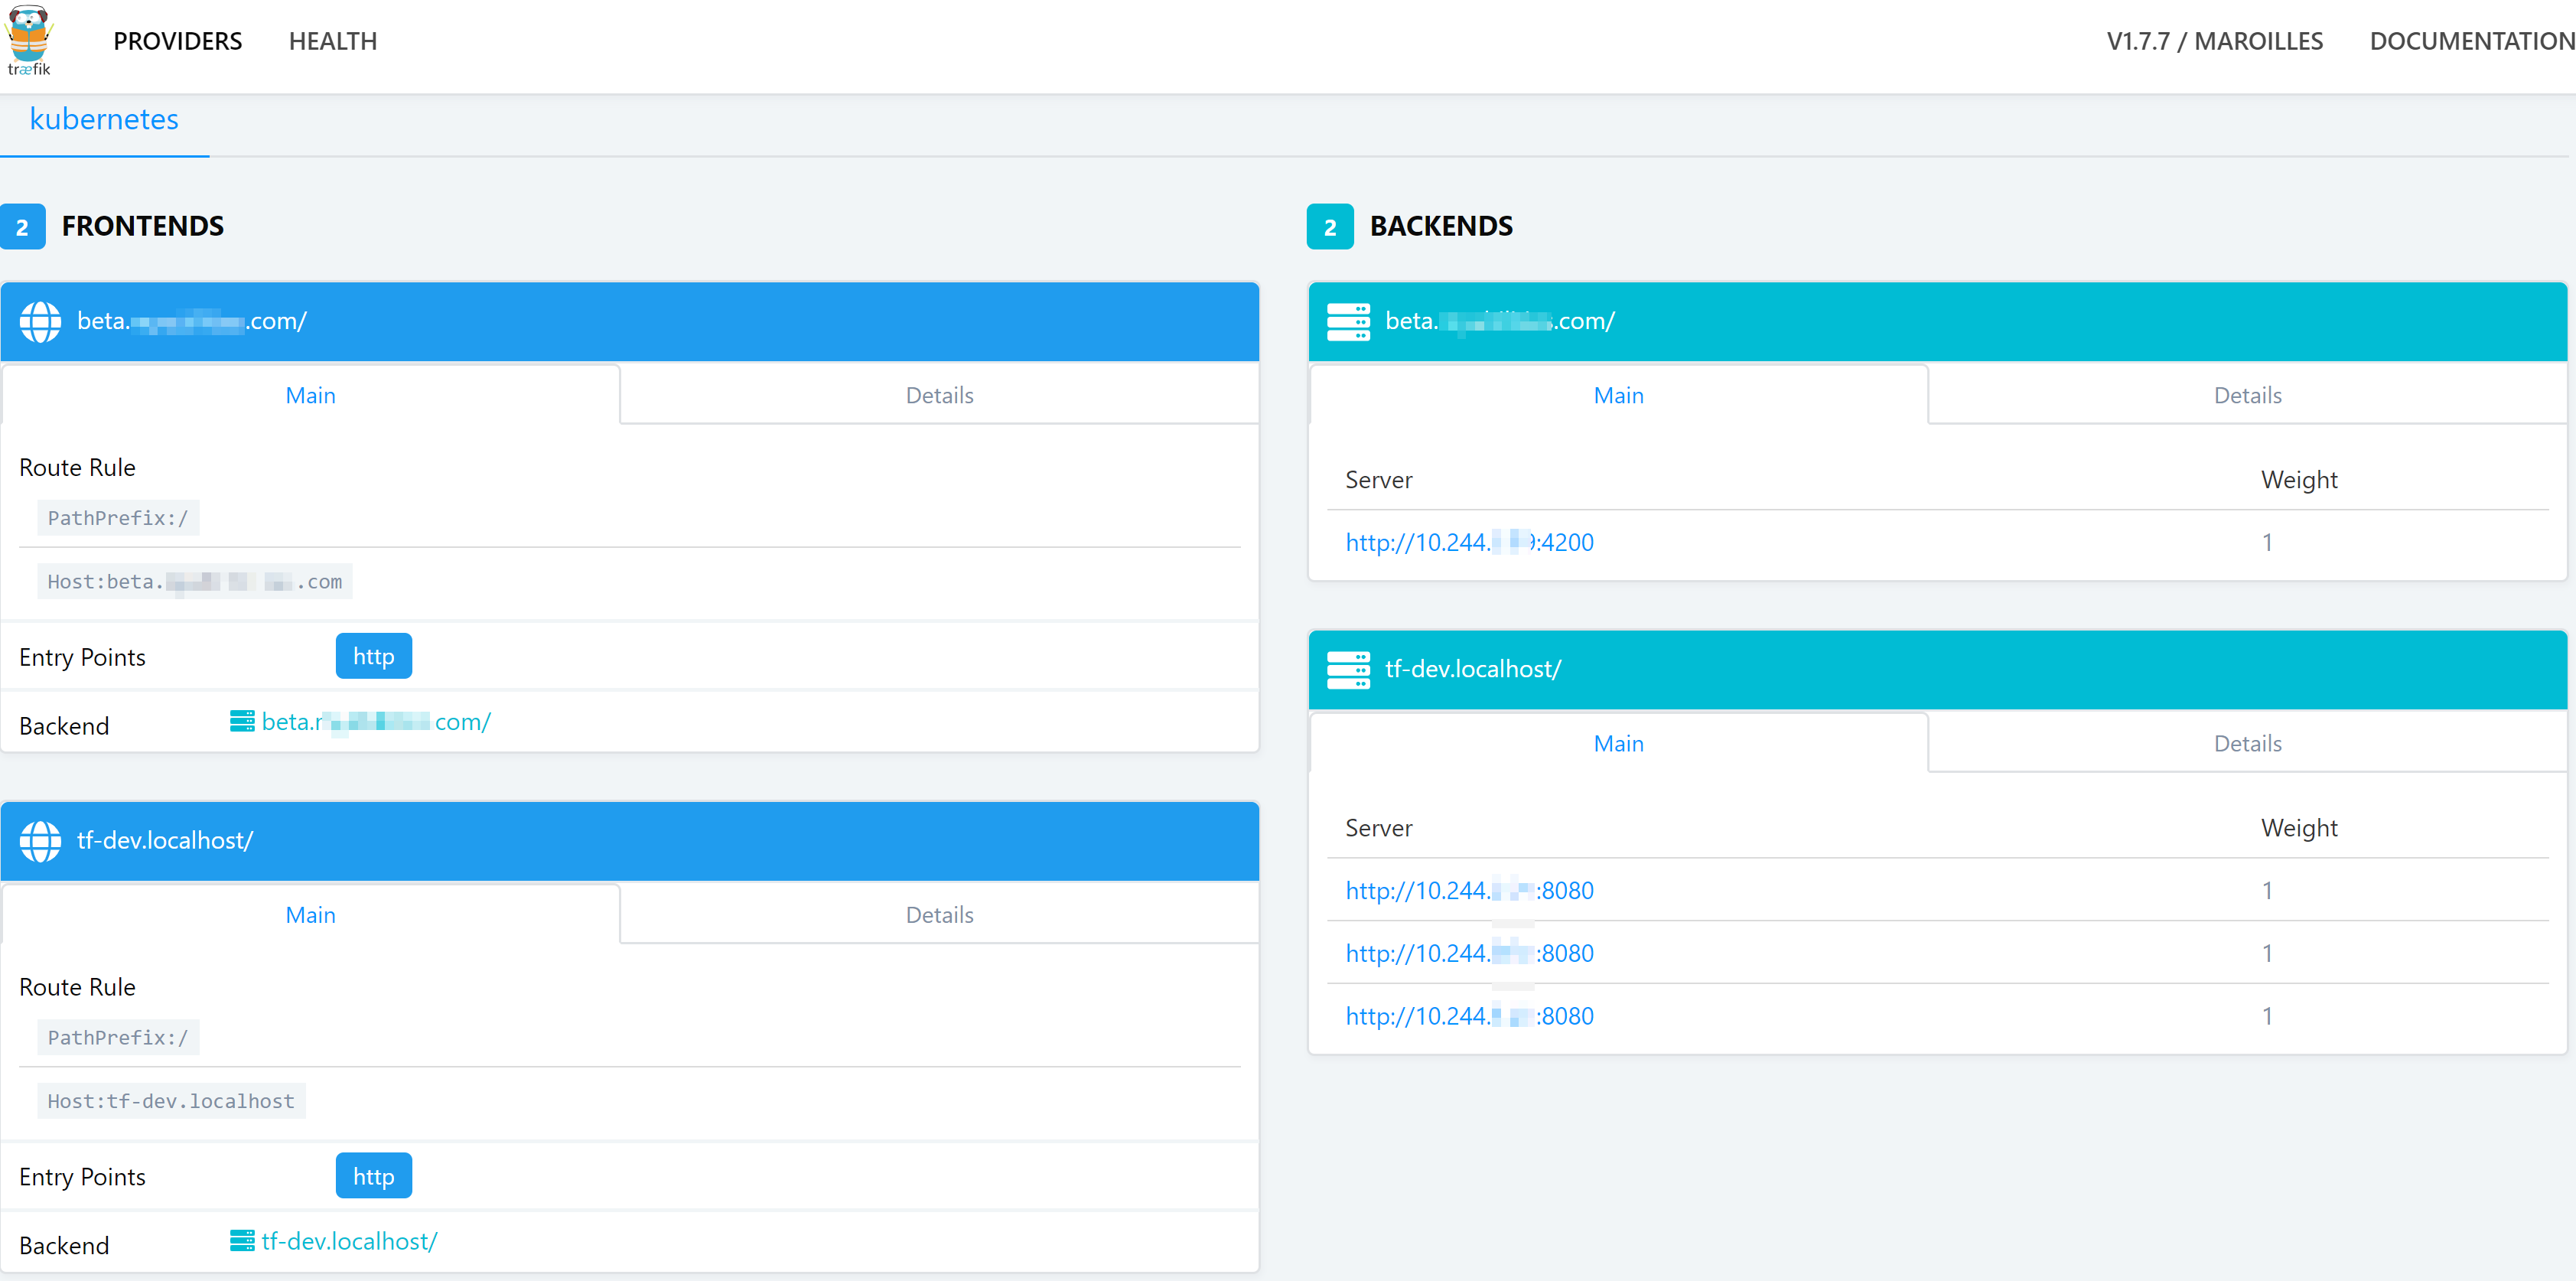
Figure 3. Traefik dashboard
This screenshot requires some more explanation. As you may have already guessed, the first record ‘tf-dev.localhost’ maps Traefik instances deployed on three different Nodes to the dashboard. Do you remember what we were discussing about DaemonSets before? Exactly! It instantiates Traefik for every Node I have in my cluster automatically, and I’ve got three.
Second record (beta.mycooldomain.com) maps or routes the traffic to the app Service I had deployed before, which is an Angular 7 website spinning on 4200 port. That’s pretty much it. In my next articles that come out every other Friday, I’ll deep dive into more details concerning deployment types and more advanced configuration like SSL enablement and termination.
If you need any help or further explanations, don’t hesitate to ask questions using the form below. Have a good one! 😉
Resources:
- Traefik documentation for Kubernetes
- Helm installation
- Ingress – official Kubernetes documentation
[1] Kubernetes ingress concepts, NGINX Ingress GitHub repo